Cisco Finesse Notifications
Table of Contents
Introduction
Cisco Finesse API introduced in version 11.X a new API that allows developers to use the notifications to inform the users that some action has taken place on Finesse UI – Finesse Toaster API. Developers, that create custom gadgets received a tool that can hide/override the browser Notification API. But is it worth to replace the native API?
The below article presents some facts, brings on top some limitations, presents a way to manage the notification in your gadgets.
Finesse Toaster Basics
Let’s start from beginning and let’s look at the code that is used to display Finesse Toaster Notification. How to find it – it’s very easy. Since Finesse version 11.0 the Finesse libraries are deployed on Finesse server and can be assessed via the following URL:
|
https:// |
where:
- <finesse_server> - is the IP or FQDN of the finesse server
When you open this link, you will get entire Finesse JavaScript library. Search for the “showToaster” function. You should get the following (for clearness, we removed the commented lines):
|
showToaster : function(title, options) { if(!_isToasterInitialized){ throw new Error("FinesseToaster.showToaster() : Finesse toaster is not initialized"); } if(_isToasterDisabled){ logger.log("FinesseToaster.showToaster() : FinesseToaster is disabled"); return; } var notification, toasterTimer; if (window.Notification && window.Notification.permission === PERMISSION_GRANTED) { if (document.hasFocus() === false || options.showWhenVisible) { if (_logger && AUTO_CLOSE_TIME > -1) { notification = _createNotification(title, options); toasterTimer = _setAutoClose(notification, options.autoClose); _addToasterListeners(notification, options, toasterTimer); } } else { _logger.log("FinesseToaster supressed : Page is visible and FineeseToaster.options.showWhenVisible is false"); } } return notification; }, |
The look at the code brings the following conclusions to the top:
-
The Toaster functionality will not work if the FinesseToaseter object is not properly initialized. If the initialization is not done
– then the exception will be thrown. But how to initialize this class. If you look at the JavaScript library documentation and the
definition of the class finesse.containerservices.FinesseToaster you will see that it has a function – init. Based on the samples and
experience we recommend that it should be called in the gadget initialization section.
-
showToaster function has a built-in logging mechanism that produce messages. Those messages will be visible only if the logger was
assigned to FinesseToaster class. But how to do it? The answer is simple – the logger must be passed as a parameter to FinesseToaster
init function.
-
The Finesse Toaster notification is a notification that will auto close on the configured time. There is now way to define infinite
notification or notification that can only be closed on user interaction. If the time parameter is not passed, then the default values
will take effect – default auto close timeout is set to 8 seconds. At this point you can start thinking why, as the code only checks if
the timeout is greater than -1. So, if we put the value from range -1 to 0 there is a chance that the code will interpret it as infinite
value. To see what will happen we need to look at another part of code – definition of the _setAutoClose() function. Below is the code
snippet (comments have been removed):
|
_setAutoClose = function(notification, autoClose) { var autoCloseTime = (autoClose && !isNaN(autoClose)) ? autoClose : AUTO_CLOSE_TIME; var toasterTimer = setTimeout(function() { notification.close(); }, autoCloseTime); return toasterTimer; }, |
-
As you can see Finesse Toaster API uses JavaScript setTimeout function. Based on this we can come to the following conclusions:
-
If you insert the negative value – the popup timeout will finish immediately, it is not equivalent to infinite value.
-
The timeout value is passed as a millisecond (1/1000 of a second).
-
setTimeout is a base function of the DOM standard. We didn’t find this in the documentation but multiple posts on Internet
indicate that the maximum value that you can pass to this function is 2147483647 (32bit integer range minus 1) which is around
25 days.
-
setTimeout can only be stopped by clearTimeout function – but the timeout handler is required (it can not be accessed as it’s a
local variable)
-
When you call the showToaster function you can pass the set of custom attributes. The Cisco doc specifies only the attributes that are
not part of Notifications API. But if you look at the code – it looks like the all custom attributes are passed to the constrictor of
the notification. This means that you can pass the custom attributes like:
-
tag: A string representing an identifying tag for the notification.
-
renotify: A boolean specifying whether the user should be notified after a new notification replaces an old one. The
default is false, which means they won't be notified.
-
requireInteraction: Indicates that a notification should remain active until the user clicks or dismisses it, rather
than closing automatically. The default value is false.
Please note:
The entire list of supported attributes can be found here.
Please note:
The custom attributes are browser specific. Some of the above parameters may work on Chrome, some on Firefox.
- If you insert the negative value – the popup timeout will finish immediately, it is not equivalent to infinite value.
- The timeout value is passed as a millisecond (1/1000 of a second).
- setTimeout is a base function of the DOM standard. We didn’t find this in the documentation but multiple posts on Internet indicate that the maximum value that you can pass to this function is 2147483647 (32bit integer range minus 1) which is around 25 days.
- setTimeout can only be stopped by clearTimeout function – but the timeout handler is required (it can not be accessed as it’s a local variable)
- tag: A string representing an identifying tag for the notification.
- renotify: A boolean specifying whether the user should be notified after a new notification replaces an old one. The default is false, which means they won't be notified.
- requireInteraction: Indicates that a notification should remain active until the user clicks or dismisses it, rather than closing automatically. The default value is false.
Please note:
The entire list of supported attributes can be found here.
Please note:
The custom attributes are browser specific. Some of the above parameters may work on Chrome, some on Firefox.
So, does this mean that if you correctly configure the notifications, they will work properly based on the provided configuration parameters.
Unfortunately, the answer is no, and the next question that comes to the head is why it will not work?
The problem is complicated and is related to the implementation method of the notification. Each browser has its own built-in mechanism to present and manage notification. Let’s look at the browsers independently.
Notifications
Notifications in Firefox
Desktop Firefox does not use system-level services, except for the Metro implementation (yet to be officially released and does not support add-ons anyway IIRC). This means that the both the SDK notifications and the HTML5 notifications use the same underlying service, the nsIAlertsService. Underneath you will find XUL alert service implementation, which is just some XUL with some JavaScript and some additional CSS, and some code to open the window. Depending on some preferences, either a hardcoded 4000ms timeout via setTimeout will be used, or a 4s CSS animation. In newer browser releases this timeout can also be extended to 20 seconds.
What this means? If you like to display a long visible/permanent notification you will need to in some way increase the default timeout hardcoded in the nsIAlertsService service.
There is no way to change the default timeout setting as Firefox doesn’t provide a configuration parameter for it. But Firefox developer created a gateway/backroad that can be used. As mentioned above the timeout can be extended by the CSS animation definition. To do it, you will need to create a special file called userChrome.css and put it in the Firefox user profile. Below is a procedure how to do it. The procedure was created for the Windows machine but same tips can be used for MacOS or Linux based machines.
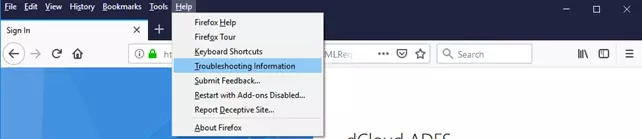
The userChrome.css file does not exist by default, so you must first create the file in the appropriate location in the Firefox profile folder. How to find it – click Firefox menu, and then Help > Troubleshooting Information.
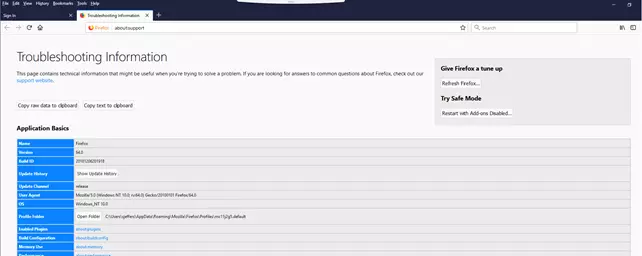
New view will be presented. On the displayed list search for Profile Folder and then click Open Folder button.
The path to the folder should be something like this (on Windows 10):
|
C:\Users\ |
where:
-
<username> - is the Windows username
-
<profile_id> - is the id of the profile – auto generated by Firefox
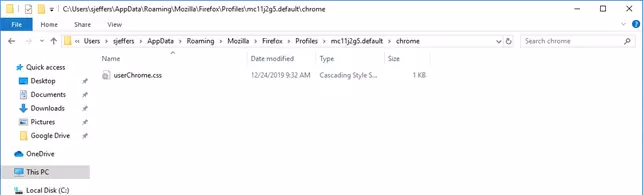
If you see a folder called "chrome" in the displayed profile folder, double-click it and search for the file userChrome.css. If you don’t see it, you will need to create it, because modern versions of Firefox don’t create it during installation. Once the folder is created, you will need to create a userCrome.css file. To do this, right-click in “crome” folder pane and select New > Text Document. Name it "userChrome.css", remembering to remove the .txt file extension. This is how it should look like after the file is created:
Now comes the tricky part. We will need to create the content of the userChrome.css file. Here is the code that needs to be entered:
|
@-moz-document url("chrome://global/content/alerts/alert.xul") { #alertBox[animate] { animation-duration: 600s !important; } } |
Please note:
In the example the timeout (animation-duration) value is set to 600s. Based on your needs extend this time to the desired timeout value. Remember
that tis setting only accepts time values with units that described for CSS standard – allowed units: ms, s (milliseconds and seconds).
Please note:
If the userChrome.css file exists, then you will need to check if the presented section has been added previously to the file. If so, please
only change the animation-duration values and save the file. If not, append the content of the file with presented config.
Once the changes have been saved, you will need to close all running instances of Firefox (only for the user for which the profile was changed) and open them once again.
Please note:
The presented solution changes the time of the notification rendering. It is possible that the presented notification (in the first stage) will
be transparent little bit longer than it usually is without the userChrome.css add-on.
To roll back the changes, simply remove the userChrome.css file from the “chrom” folder and restart all running (for the user) instances of the Firefox browser.
More information about the files and Firefox can be found here:
-
userChrome.css - http://kb.mozillazine.org/index.php?title=UserChrome.css
-
Firefox user profiles - http://kb.mozillazine.org/Profile_folder#Folders
Notifications in Chrome
Google Chrome browser uses the OS platform SDK’s to present the notifications. This method is more flexible than the one used by Firefox as it delivers more out off the box features/options that can be used. Here are some facts that you need to know about Push Notifications:
-
Push Notifications are assembled using two Chrome APIs: Notifications API and the Push API. The Notifications API lets the app display
system notifications to the user. The Push API allows a service worker to handle Push Messages from a server, even while the app is not
active.
-
The Notification and Push API's are built on top of the Service Worker API, which responds to push message events in the background and
relays them to your application.
Does this mean that the notifications can be permanent, have infinite display time? Unfortunately, the answer is not obvious.
As mentioned above, Chrome Push Notifications use the OS SDK related functions. This means that the developer has access to parameters that define the behavior of the notification. One of available attribute options used when creating notifications is requireInteraction. In most situations if this option is set to true. In this case user can close the notification only when if makes some action on notification – clicks the Close button. This perfectly works when the native Notification API is used. When switching to Finesse notifications API the mechanism has some problems.
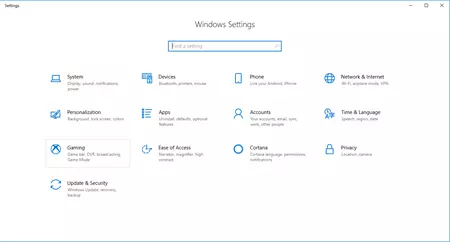
It is also possible that the display of the notification relays on the configuration of the OS. Lets’ look at the Windows 10. Please open the Windws Settings app (right click on a start button and select Settings). From the available tools select Ease of Access category.
Next, on the presented window search for section Simplify and personalize Windows where you find setting called Show notifications for.
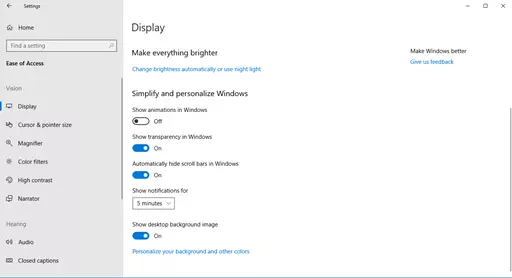
By default, the timeout is set to 5 seconds. If this timeout occurs, notification will be closed. The setting allows you to set one of the following predefined values: 5s, 7s, 15s, 30s, 1min, 5min. What to do when the timeout should be set to custom value? Change the value in registry under:
|
HKEY_CURRENT_USER\Control Panel\Accessibility |
Modify the DWORD value named MessageDuration. If you do not have such a value, then just create it. Enter its value data in decimals. You should specify the new value in seconds. The default value is 5 seconds, and you cannot specify the timeout value lower than 5, otherwise Windows will ignore it and still use 5 seconds.
Once the setup is complete, Windows user will need to sign out and sign into Windows session for the new settings to take effect.